How to level up retouching

Let’s talk about some useful techniques to level up your photo retouching skills. Everything written below is strictly my own personal experiences.

- The first thing I’d recommend to do is to just copy someone else’s retouch. Find a before/after example (I’m talking here mainly about a whole photo rather then detailed one. Say, if you find a before/after beauty retouch on the Internet sized 800*800 pixels, it’ll be impossible to recreate the skin or other little details retouch due to the small size of the photo). Copy the retouch trying to get to the original as close as you can. The way you’re going to do this doesn’t matter at all: you can use plug-ins, hands or read spells. The goal is to make it as similar to the original as possible. If your result resembles the original photo, just some part seems impossible to copy, that is still good as some moments, especially insignificant ones, are not important at all (at this stage of your self-education). The idea is to make your photo similar to the original as a whole.
- The second step is to try retouching using the built-in Photoshop instruments as much as possible (and not plug-ins). If you rely only on plug-ins, you won’t understand what’s happening with the picture as a whole. Like, say, I choose a preset Cross-process in Color Effects, press okay and it’s done. But what if I don’t have this plug-in but need the same result? What do I do then? Nothing. Learning the instruments built in the program you’ll start to understand when there’s a need to change white for yellow or black for blue and will know where to do it. This is just a simple example. And here I want you to understand that I’m not making you give up plug-ins but encouraging you to get to grips with the built-in instruments for a better understanding of the process. This is actually really important.
- The third step is the development of your taste. And here I talk not about the taste to retouching but photography in general. If you have no educated taste at all, you’ll be able to copy but later you won’t be able to create something yourself. Apart from retouching this also includes shooting. There are different ways to develop your taste. One of them is to look through the works of others, which are not just better than your current level but are made by professionals. For example, you should look through about 50 good photos a day. As a result in about couple of months (it’s all individual though) your eye will get used to a good level and will distinguish quality photos from simple ones. Accordingly, your taste will develop as well. You can also attend some art events, not necessarily connected with photography. The more creative person you are, the more you are interested in different types of art, the easier it is for you to develop your taste.
- Step four is to analyze what you see. This advice works both for retouching and shooting. I won’t give you advice on shooting as I’m a hack here myself. Let’s talk about retouching. Looking at the photo that you know has been retouched, pay attention to the details. Like, here should be greens but the color looks unnatural. That means it has been changed. Here is a halation, which means they have skived were trying to make a pseudo-HDR, in other words to enhance the tone contrast. A uniform color is supposed to be here but instead it’s changing, which means they were coloring locally, etc. Decompose the pictures by color/contrast/light/perspective/etc. Here you should know that lots of works (professional ones) are nowadays created either with the use of CGI (computer graphics) or Compositing (collage). And such photos are really tricky to decompose. To better understand what I’m talking about here study these cool guys, where they show their collages and 3D:
http://www.glucone-r.com/ Compositing + CGI.
https://asile-paris.com/portfolio/making-of/ Compositing + CGI.
Step five is to always align yourself with those who’s a cut above you. Not just with those who’s doing it a little bit better but with who’s really cooler than you.
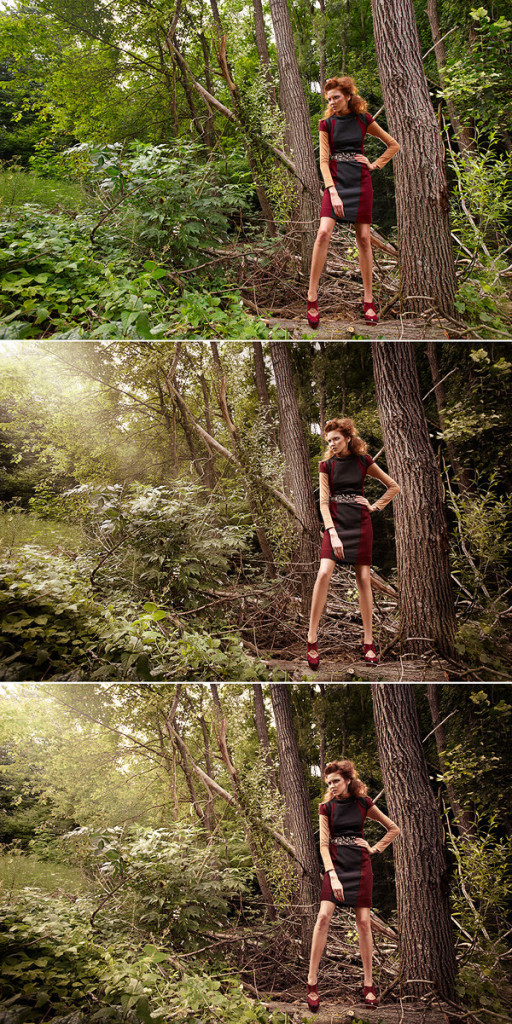
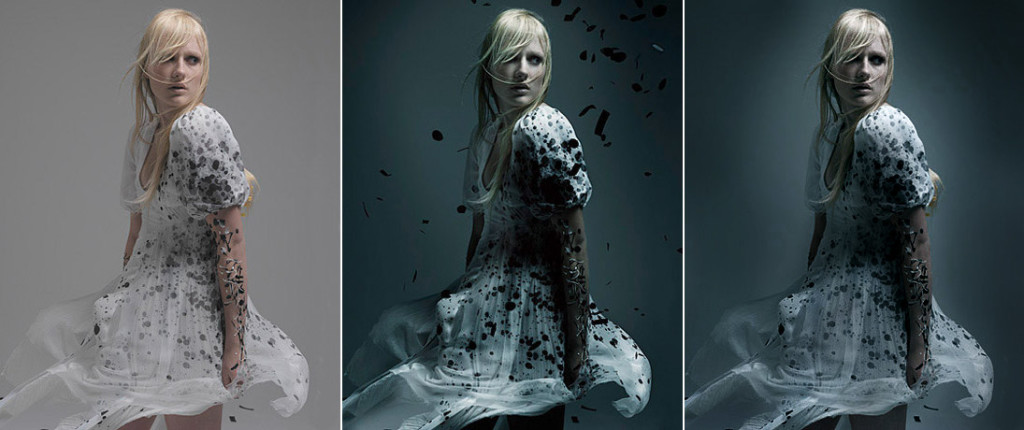
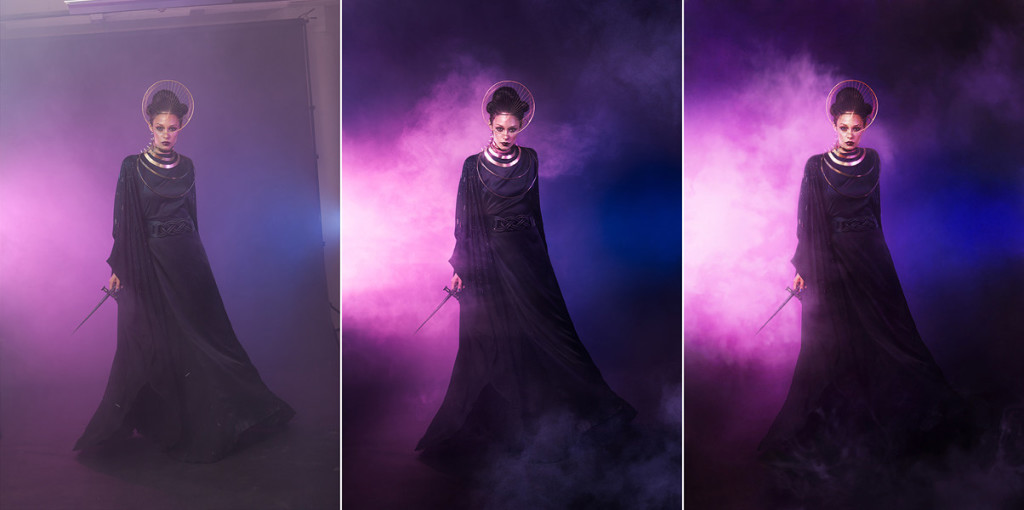
Here are a few examples of the before/after photos I found on the internet. I used the “before” ones and was trying to turn them into the “after” ones. First, you’ll see the “before” picture, then the author’s variant, and then mine. All the pictures were made ages ago that’s why some of them are not super.
1. This pic -only Lightroom (I was intrigued whether you can recreate it using just this program)
2.

3. This one was made not long ago. The author said he used only Lightroom to get these colors. I decided to try. There’s still a difference, but I was close in general.

4.

5.
6.
That’s all. Practice retouching and you will succeed!
If you have some questions, don’t hesitate to ask.
How to leel up retouching